
How to uninstall
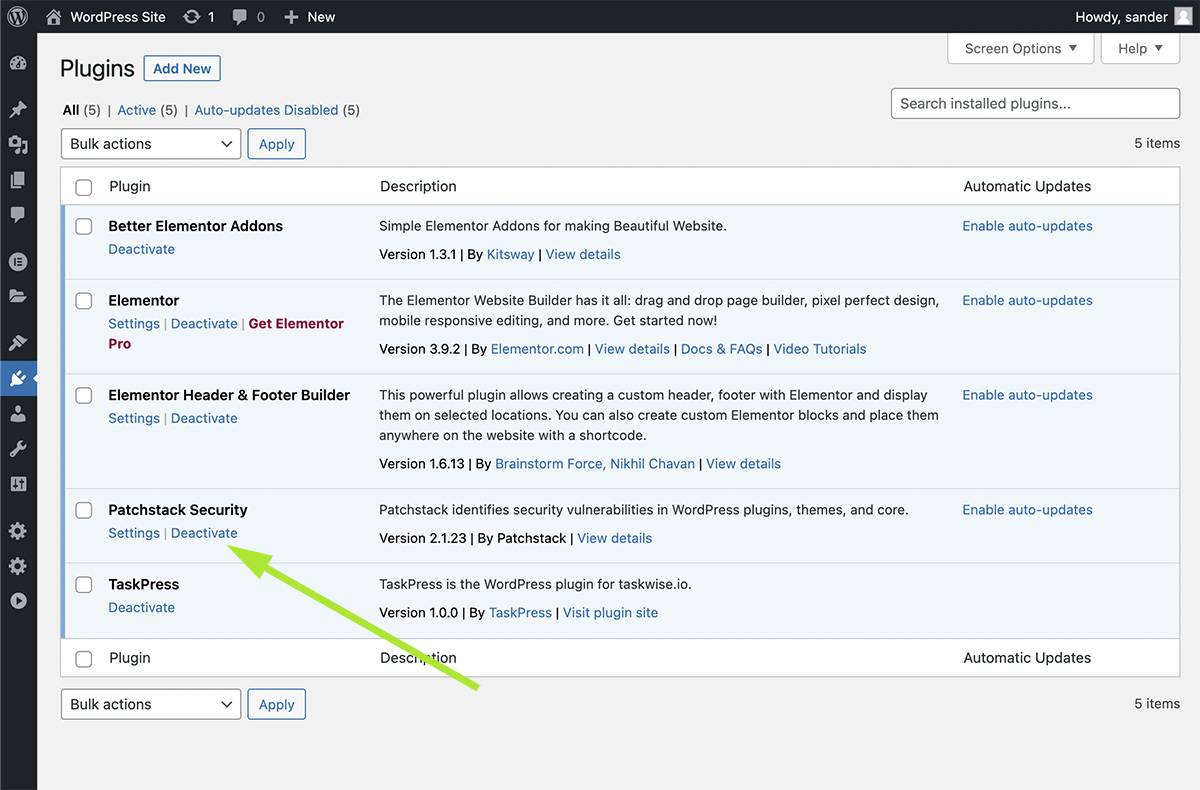
You can deactivate and uninstall the Patchstack plugin just like any other WordPress plugin.
We recommend uninstalling it from the WordPress admin panel to have the plugin and its data correctly removed from the server (files and database entries).
Uninstalling removes most Patchstack options and its log tables for the site being cleaned up. It deliberately retains connection credentials, CAPTCHA settings and attack counters in the options table. User 2FA enrollment is stored separately in user metadata. Reinstalling therefore does not start with a completely empty configuration.
If auto-prepend is enabled, first disable it and check that PHP no longer references its loader, as described below. To deactivate, go to your Plugins page, find Patchstack Security, click on Deactivate and then Delete
Remove all local Patchstack data
Section titled “Remove all local Patchstack data”Use these steps when you want a clean removal rather than retaining settings for a reinstall. Back up the database and server configuration first: deleting credentials, CAPTCHA keys and 2FA enrollment cannot be undone without a backup.
On multisite, distinguish removal from one subsite from removal from the whole WordPress installation. Plugin files, server configuration, user metadata and the object cache can be shared by other sites or networks. Only remove that shared data after every site using it has stopped using Patchstack.
1. Remove server integration before deleting its files
Section titled “1. Remove server integration before deleting its files”While the plugin is still installed, disable auto-prepend and deactivate Patchstack normally. On multisite, manage the shared installer from the primary site of the primary network and remove all remaining site/network activations before deleting shared files.
Check the hardening .htaccess location and, for subdirectory or Bedrock installs, the old WordPress core directory too. Remove only Patchstack-owned blocks that remain, preserving WordPress rewrite rules and other software’s configuration:
- Hardening blocks marked
BEGIN Patchstack/END Patchstack, or the legacyBEGIN WEBARX/END WEBARXmarkers. - Auto-prepend blocks marked
# BEGIN AP Patchstack/# END AP Patchstackin.htaccess. - Auto-prepend blocks marked
; BEGIN AP Patchstack/; END AP Patchstackin.user.ini, or the configured user-INI filename.
Also check any host-managed PHP/FPM or web-server configuration for an auto_prepend_file directive pointing to Patchstack’s mu-plugin-ap.php. Remove that reference before deleting the loader. If PHP still uses a cached user-INI configuration, ask the host to reload the relevant PHP workers and verify the reference is gone. A reference to a deleted prepend file can prevent PHP requests from starting.
2. Remove remaining plugin-owned files
Section titled “2. Remove remaining plugin-owned files”After server references are removed, uninstall the normal plugin and inspect these locations for leftovers:
WP_PLUGIN_DIR/patchstack/, normallywp-content/plugins/patchstack/, and a leftoverWP_PLUGIN_DIR/webarx/directory from an older WebARX installation.WPMU_PLUGIN_DIR/patchstack.phpandWPMU_PLUGIN_DIR/_patchstack.php, the early firewall loaders.WPMU_PLUGIN_DIR/patchstack/if the full plugin was installed as a must-use plugin.WP_CONTENT_DIR/pslogs/, including auto-prepend logs and config/backup files.
Use the actual content and must-use plugin directories for your deployment. Remove Patchstack-specific constants from wp-config.php and custom integration callbacks or MU files you added, such as patchstack-customizations.php. Preserve unrelated code if it shares the file.
3. Delete the site’s remaining options and tables
Section titled “3. Delete the site’s remaining options and tables”With Patchstack and any legacy WebARX loader inactive, inspect the remaining option names without displaying stored credentials:
wp --url=https://site.example option list --search='*patchstack*' --field=option_namewp --url=https://site.example option list --search='*webarx*' --field=option_nameReplace the example URL with the site being cleaned up. After reviewing the names, this deletes options and database-backed transients under the plugin’s current and legacy prefixes for that site:
for namespace in patchstack webarx; do for pattern in "${namespace}_*" \ "_transient_${namespace}_*" "_transient_timeout_${namespace}_*" \ "_site_transient_${namespace}_*" "_site_transient_timeout_${namespace}_*"; do wp --url=https://site.example option list --search="$pattern" --field=option_name | while IFS= read -r option; do wp --url=https://site.example option delete "$option" done donedoneThese commands replace normal reinstall retention with deletion, including the API credentials and CAPTCHA settings. Older WebARX installations may also have an external_updates-webarx option; remove it if present. Use the WordPress option commands for any other reviewed plugin-owned entries.
Using your database administration tool, inspect and remove remaining tables with that site’s actual table prefix followed by patchstack_ or webarx_. Current tables include patchstack_firewall_log, patchstack_event_log and patchstack_logic; older versions can also leave user_log, visitor_log, file_hashes or ip tables under those plugin prefixes. Do not delete WordPress’s own tables.
On multisite, repeat the per-site cleanup for every site being removed. The normal uninstall does not loop through and clean every subsite’s tables and options.
4. Remove shared network options and user metadata
Section titled “4. Remove shared network options and user metadata”For a complete multisite removal, also review network options. This example lists names in network ID 1; replace the ID with the network being cleaned up:
wp site option list --site_id=1 --search='*patchstack*' --fields=site_id,meta_keywp site option list --site_id=1 --search='*webarx*' --fields=site_id,meta_keyRemove the reviewed plugin-owned network options with wp --url=https://primary.example site option delete OPTION_NAME, using a primary-site URL from the intended network. This includes the remote-management grant, cached 2FA policy, update queues, hardening state and any retained credentials. Inspect network transient keys too. Repeat only for networks being fully removed.
User 2FA data lives in the shared user-metadata table, including on single-site WordPress. Remove plugin-owned metadata under patchstack_2fa_, _patchstack_2fa_ and webarx_2fa_, including enrollment, secrets, replay/cooldown state and pending resets. Older user-option rows can have a site’s table prefix before webarx_2fa_; inspect those too. Delete metadata rows only, not the WordPress users. On multisite, this affects the same accounts across sites and networks, so retain it if any remaining site still needs that enrollment.
5. Remove stale scheduled work and cache entries
Section titled “5. Remove stale scheduled work and cache entries”Normal deactivation clears Patchstack’s scheduled jobs. Check each site’s cron events for any remaining patchstack_ hooks and the legacy puc_cron_check_updates-webarx hook, and remove those specific events. Keep WordPress’s shared maintenance events, such as wp_scheduled_delete.
Database-backed transient rows are covered above. For Redis, Memcached or another persistent object cache, ask the host to clear the cache namespace belonging to this WordPress installation after cleanup. A cache-wide flush can affect other sites sharing that cache.
Remove the site from Patchstack App separately
Section titled “Remove the site from Patchstack App separately”Deleting the WordPress plugin and local data does not remove the site record or already uploaded logs from Patchstack App. Follow removing a site for the separate App-side action. Copies in your own backups or hosting logs have their own retention; local uninstall does not erase those copies.